
Add a background job in one language. Process it in another.
bunqueue is a free, self-hosted job queue for Node.js, Deno, Python, PHP, Go, Rust, Elixir and Bun. Run the server yourself, or embed the queue in a Bun app.
- Free, including the server
- Every queue feature ships under MIT. There is no paid tier.
- Your infrastructure
- Run it locally, on a VPS or in Docker, with SQLite or PostgreSQL.
- Bun app? Embed it
- Queue and worker run in one process, with no server to operate.
Learn bunqueue, one episode at a time.
A free course on YouTube, from your first queue to production. Every episode follows a guide in these docs, with chapters and English subtitles.
- 7 episodes out
- 2 h 11 min of video
- 4 more on the way
-
 19:14 Episode 01 Quickstart Your first job queue
 -
 25:37 Episode 02 Queue Add, dedupe, control
 -
 24:46 Episode 03 Worker Leases, heartbeats, retries
 -
 19:44 Episode 04 Cron & Scheduler Schedules that survive restarts
 -
 21:12 Episode 05 Dead Letter Queue Retries, stalls, the DLQ
 -
 18:56 Episode 06 FlowProducer Parents wait for children
Coming next
Hand agents the queue. Keep the final say.
Claude, Cursor and any MCP client get 75 tools over stdio or Streamable HTTP. Three opt-in features keep the context small and destructive calls in your hands.
claude mcp add bunqueue \
-e BUNQUEUE_MCP_TOOLSETS=dynamic \
-e BUNQUEUE_MCP_CONFIRM=destructive \
-- bunx --package=bunqueue bunqueue-mcp- Agent
bunqueue_obliterate_queue { queue: "billing" } - bunqueue
Permanently delete queue "billing" and every job in it (1204 waiting, 0 prioritized, 0 delayed, 3 active, 18330 completed, 2 failed), including results and logs.
Run it?
- You
Decline
- bunqueue
executed: falseThe user did not confirm this operation.
BUNQUEUE_MCP_CONFIRM=destructive in a client that can ask you.-
BUNQUEUE_MCP_TOOLSETSLoad only the tools you need.
The 75 tools come in 11 toolsets. Expose a few, or start the agent from a catalog and load groups on demand: with one loaded, 1,300 to 4,600 tokens of context per request instead of about 16,000.
Toolsets -
BUNQUEUE_MCP_CONFIRMDestructive calls ask first.
Obliterate, drain, purge and six more show their exact impact and run only after you confirm in your client. A decline always wins.
Confirmation -
BUNQUEUE_MCP_DECISION_*Decision models, built in.
A decision model routes plain-language requests to the right toolset and double-checks destructive ones. It can block a call, never approve one.
Decision models
Supported decision models
- Jev TypeSafe
- Clef Workers AI or self-hosted
- Clef-flash Workers AI or self-hosted
- Kev 9B Self-hosted
- Laya Self-hosted
- DiffusionGemma Jev Self-hosted
One client for the SystemOne request format: TypeSafe, Cloudflare Workers AI or any compatible endpoint you host. Optional; every feature above works without a model.
Every terminal is a sealed machine.
agentvm runs Claude Code agents in parallel on your Mac, each in its own disposable Debian VM on Apple’s Virtualization.framework. Inside, Claude is root with every permission; your files stay out of reach. The work comes back to your repository as a branch, and the VM is thrown away.
git clone \
https://github.com/egeominotti/agentvm
cd agentvm && ./quickstartNeeds a Mac with Apple silicon, Xcode Command Line Tools, Rust and Bun. No tagged releases yet: it runs from source.
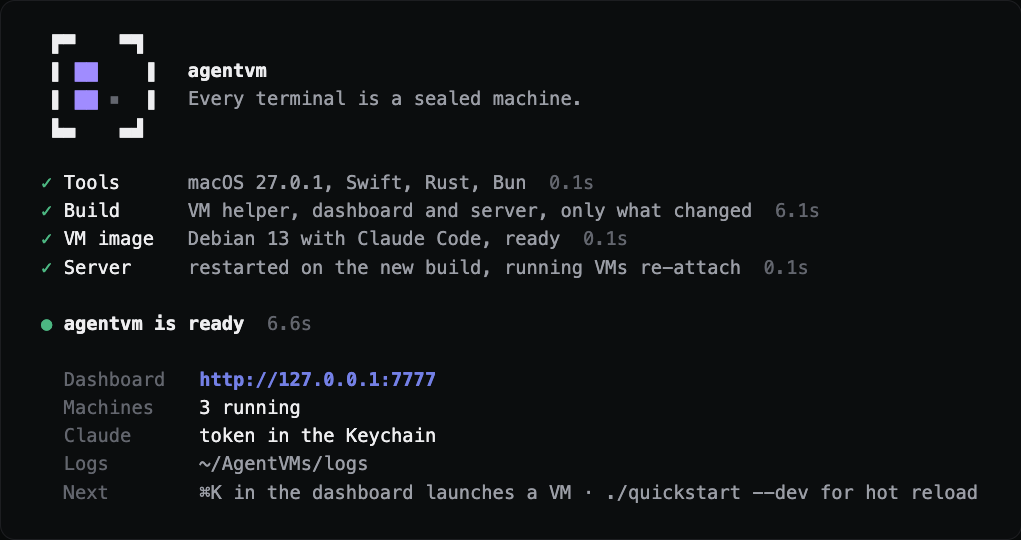
One command builds it and starts it
./quickstart checks the tools (Swift, Rust and Bun), builds the VM helper, the dashboard and the server, and opens the dashboard on 127.0.0.1:7777. The first run also builds the VM image, Debian 13 with Claude Code: about 2 minutes, once.
Run it again after every git pull: it rebuilds only what changed, takes about a second when nothing did, and running VMs re-attach to the new server. Save your Claude token once, from claude setup-token, in Settings › Claude account; it goes to the macOS Keychain.
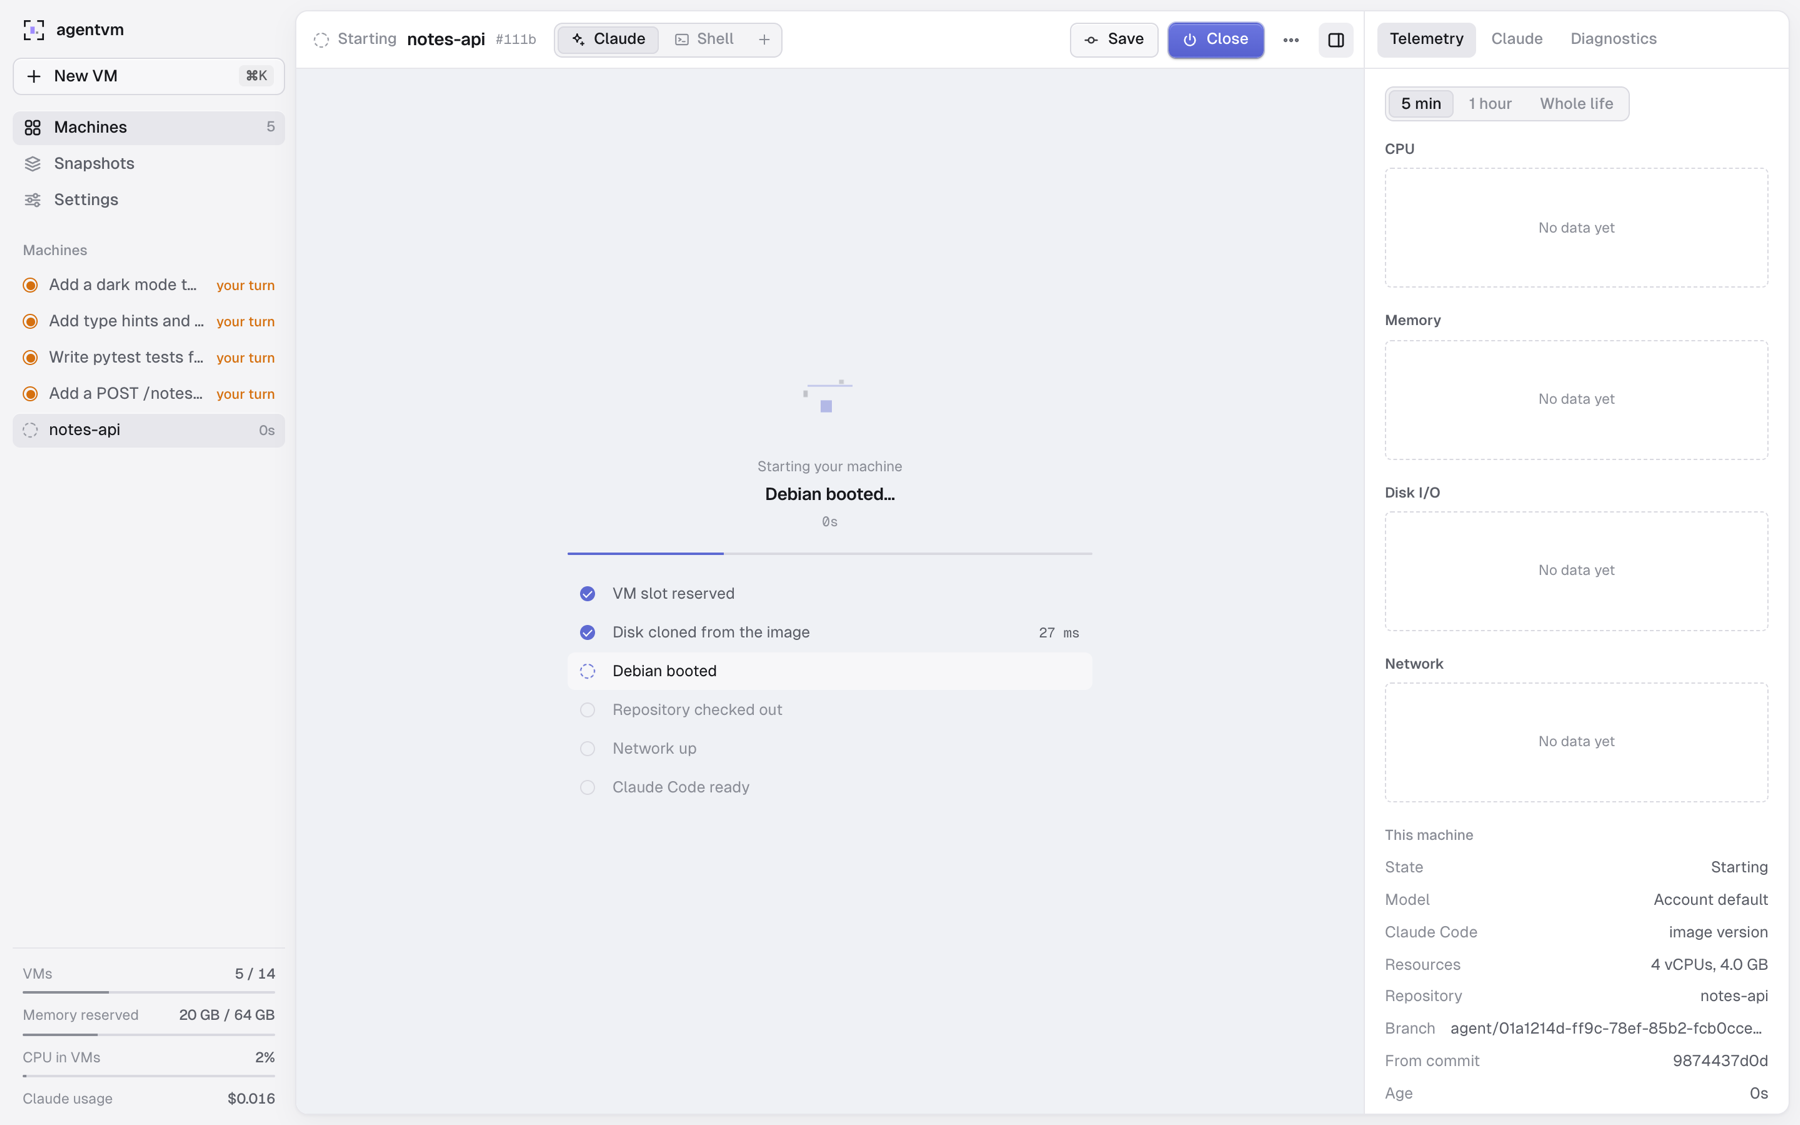
A new VM in about 2 seconds
Press New VM (⌘K) and give it a folder on your Mac or a git link: github.com/owner/repo, owner/repo, https or ssh, on any host. Pick the branch, the model, the Claude Code version, vCPUs and memory. Private repositories open with your Mac’s own git access or a token saved per host.
The boot is shown as it happens, from real events with their timings: a slot is reserved, the disk is cloned from the prebuilt image in milliseconds, Debian boots, the repository is checked out, the network comes up and Claude Code is ready. A .agentvm/setup.sh in the repository runs as root before Claude starts.
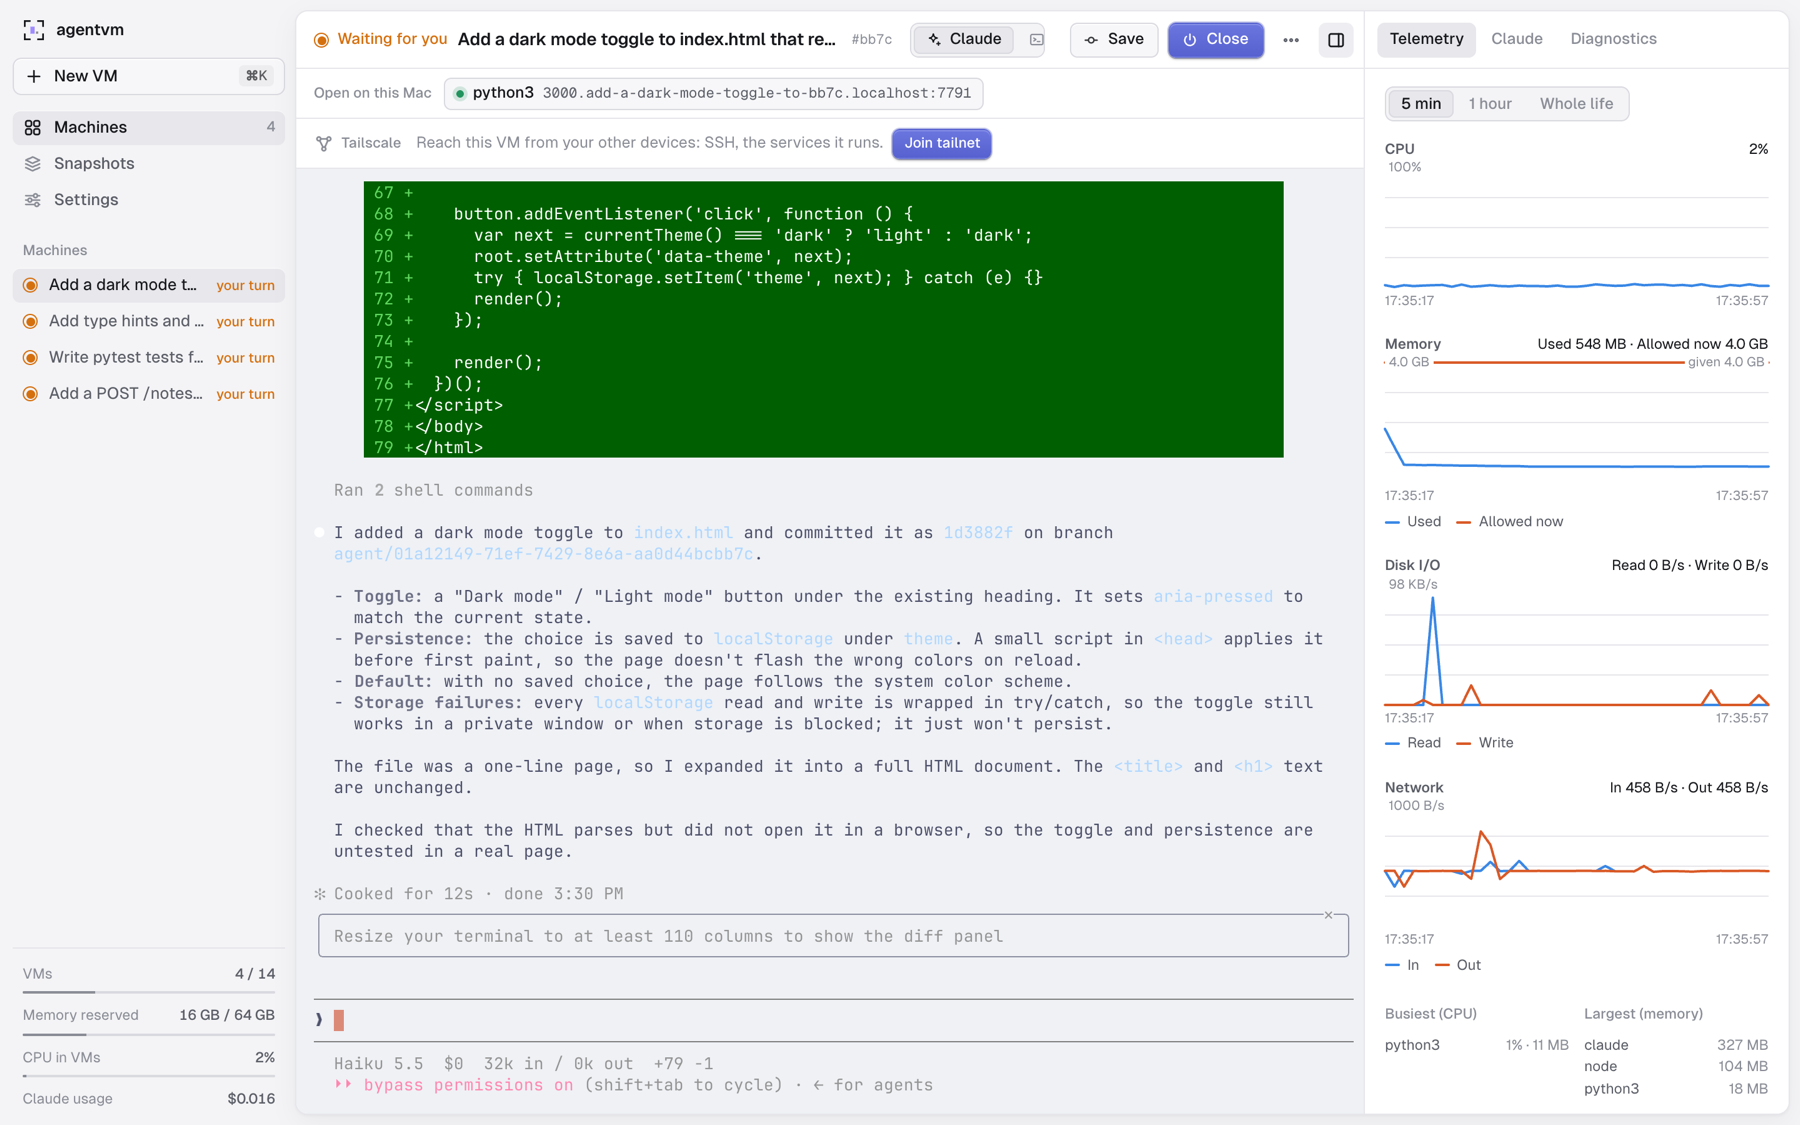
Claude as root, in terminals you drive
Claude Code runs as root with every permission (--dangerously-skip-permissions) on a fresh checkout in /root/work. It can install packages, start servers and break things: the VM sees only its own job folder, and your files and your checkout never enter it.
Each VM has a Claude tab and up to nine shells, real terminals in the browser that survive a page reload. A web service in the VM appears in the bar above at its own address, http://3000.<vm>.localhost:7777, so every VM can serve port 3000 at once. On the right: CPU, memory, disk and network, plus Claude’s conversation, cost and tokens. Tailscale is one click away.
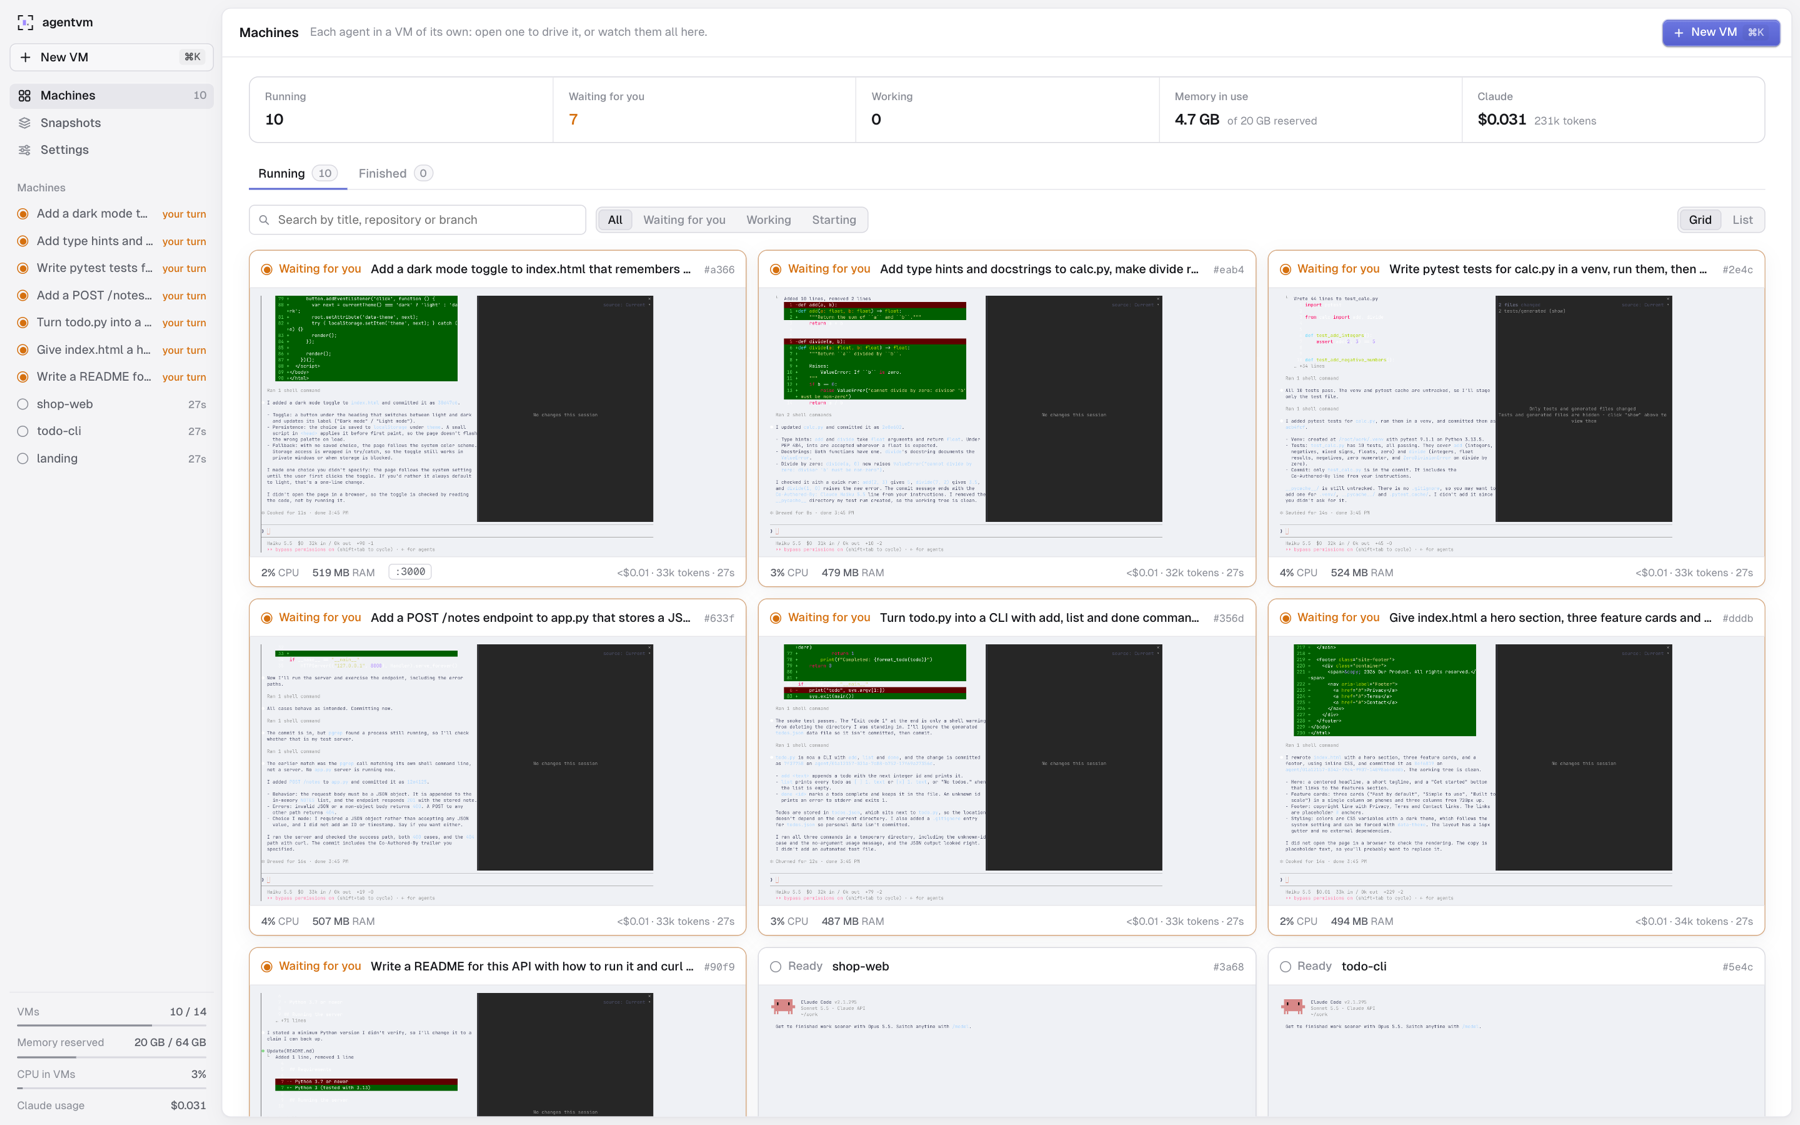
Every agent on one screen
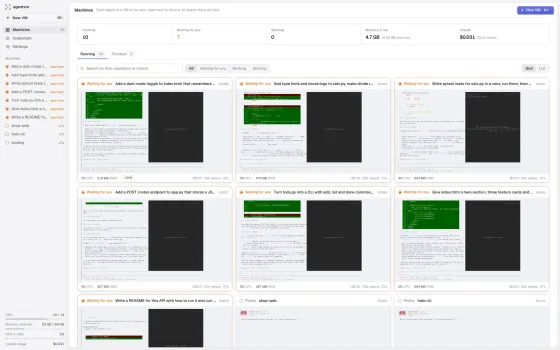
The Machines page counts what is running, what waits for you and what is still working, the memory in use and what Claude has spent. Each card is a live view of a VM’s terminal, with its CPU, memory, open ports and cost.
Here ten VMs share one Mac: seven agents have finished and wait for review, three terminals are ready, and 4.7 GB of memory is in use. Search and filter them, switch to the list, and find closed ones under Finished.
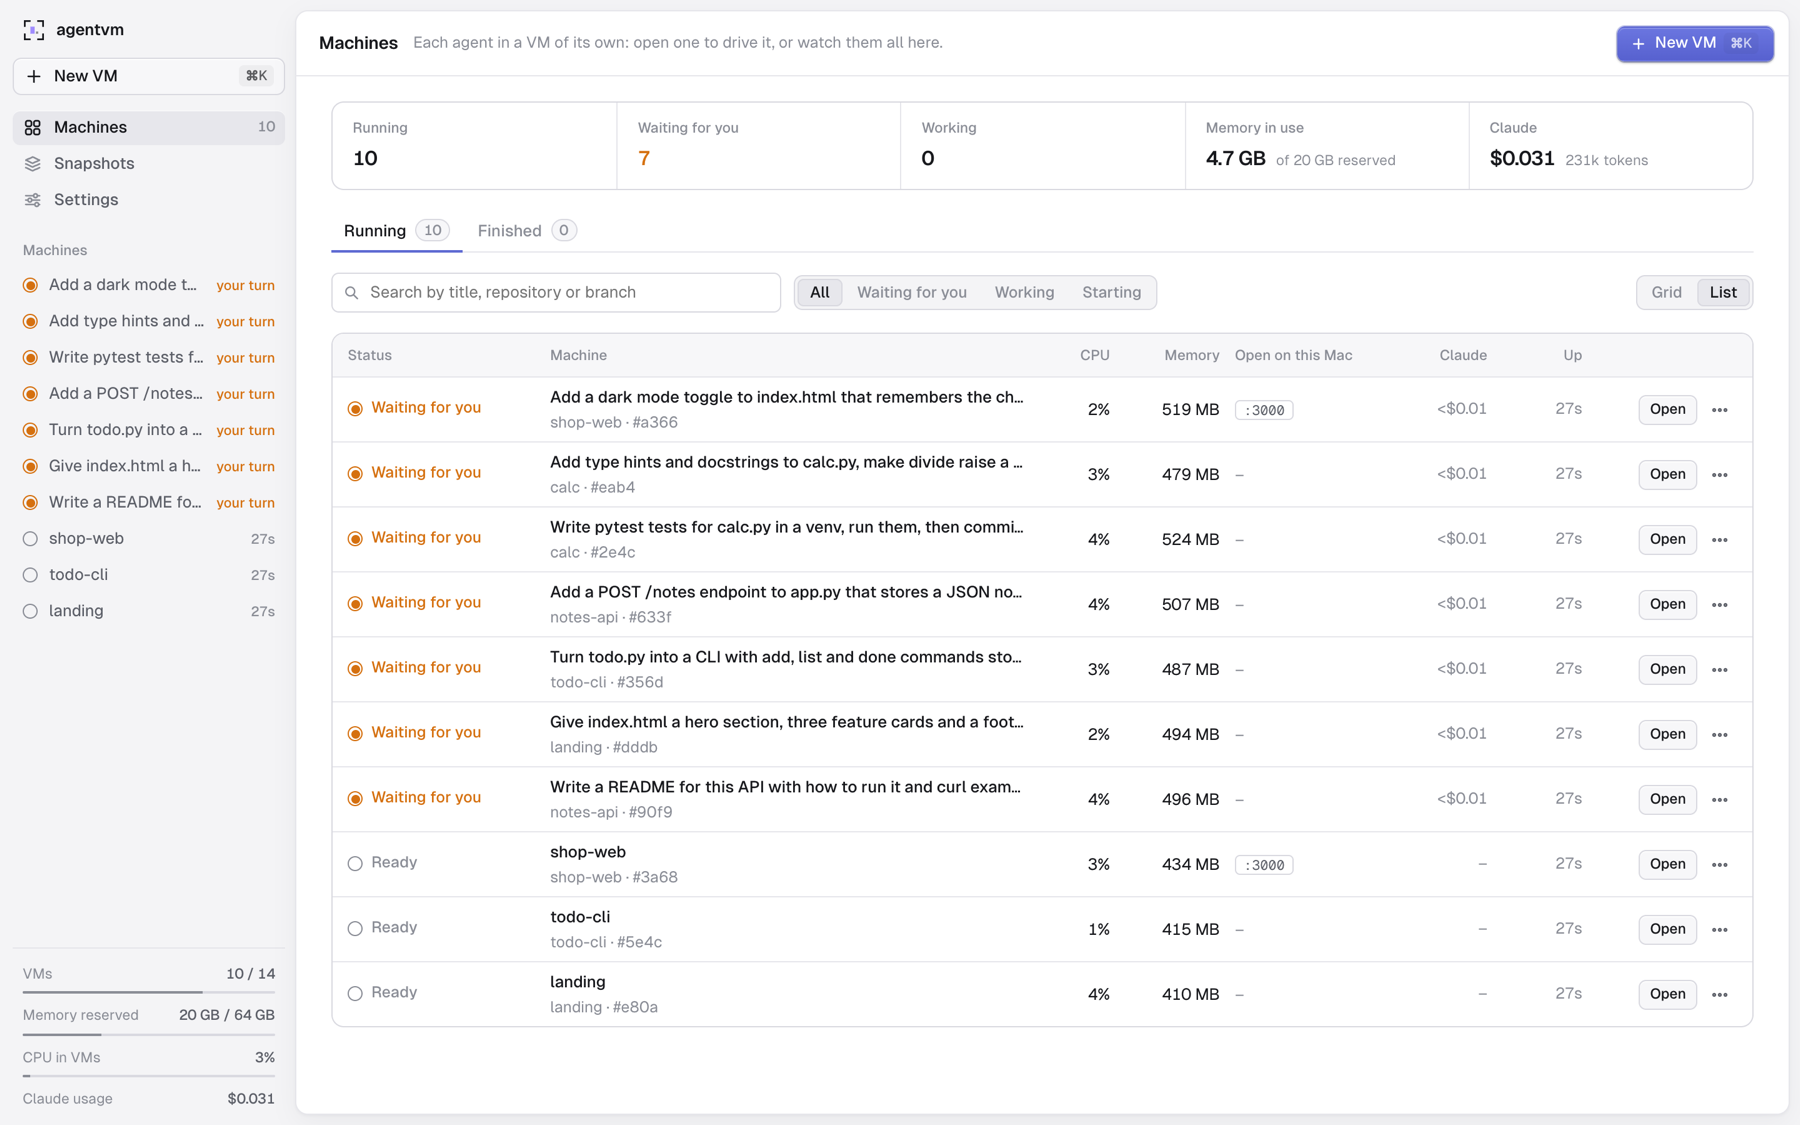
The work comes back as a branch
As a list, every VM shows its status, CPU, memory, ports, Claude’s spend and uptime, with Open, Save, Snapshot and Close.
Save commits whatever the agent left uncommitted and copies the VM’s commits to agent/<id> in your repository while the VM keeps running; Close saves, then shuts it down. Review it with git switch agent/<id>, take it with git merge, or push it to origin from the dashboard (never forced) with a link to its pull request.
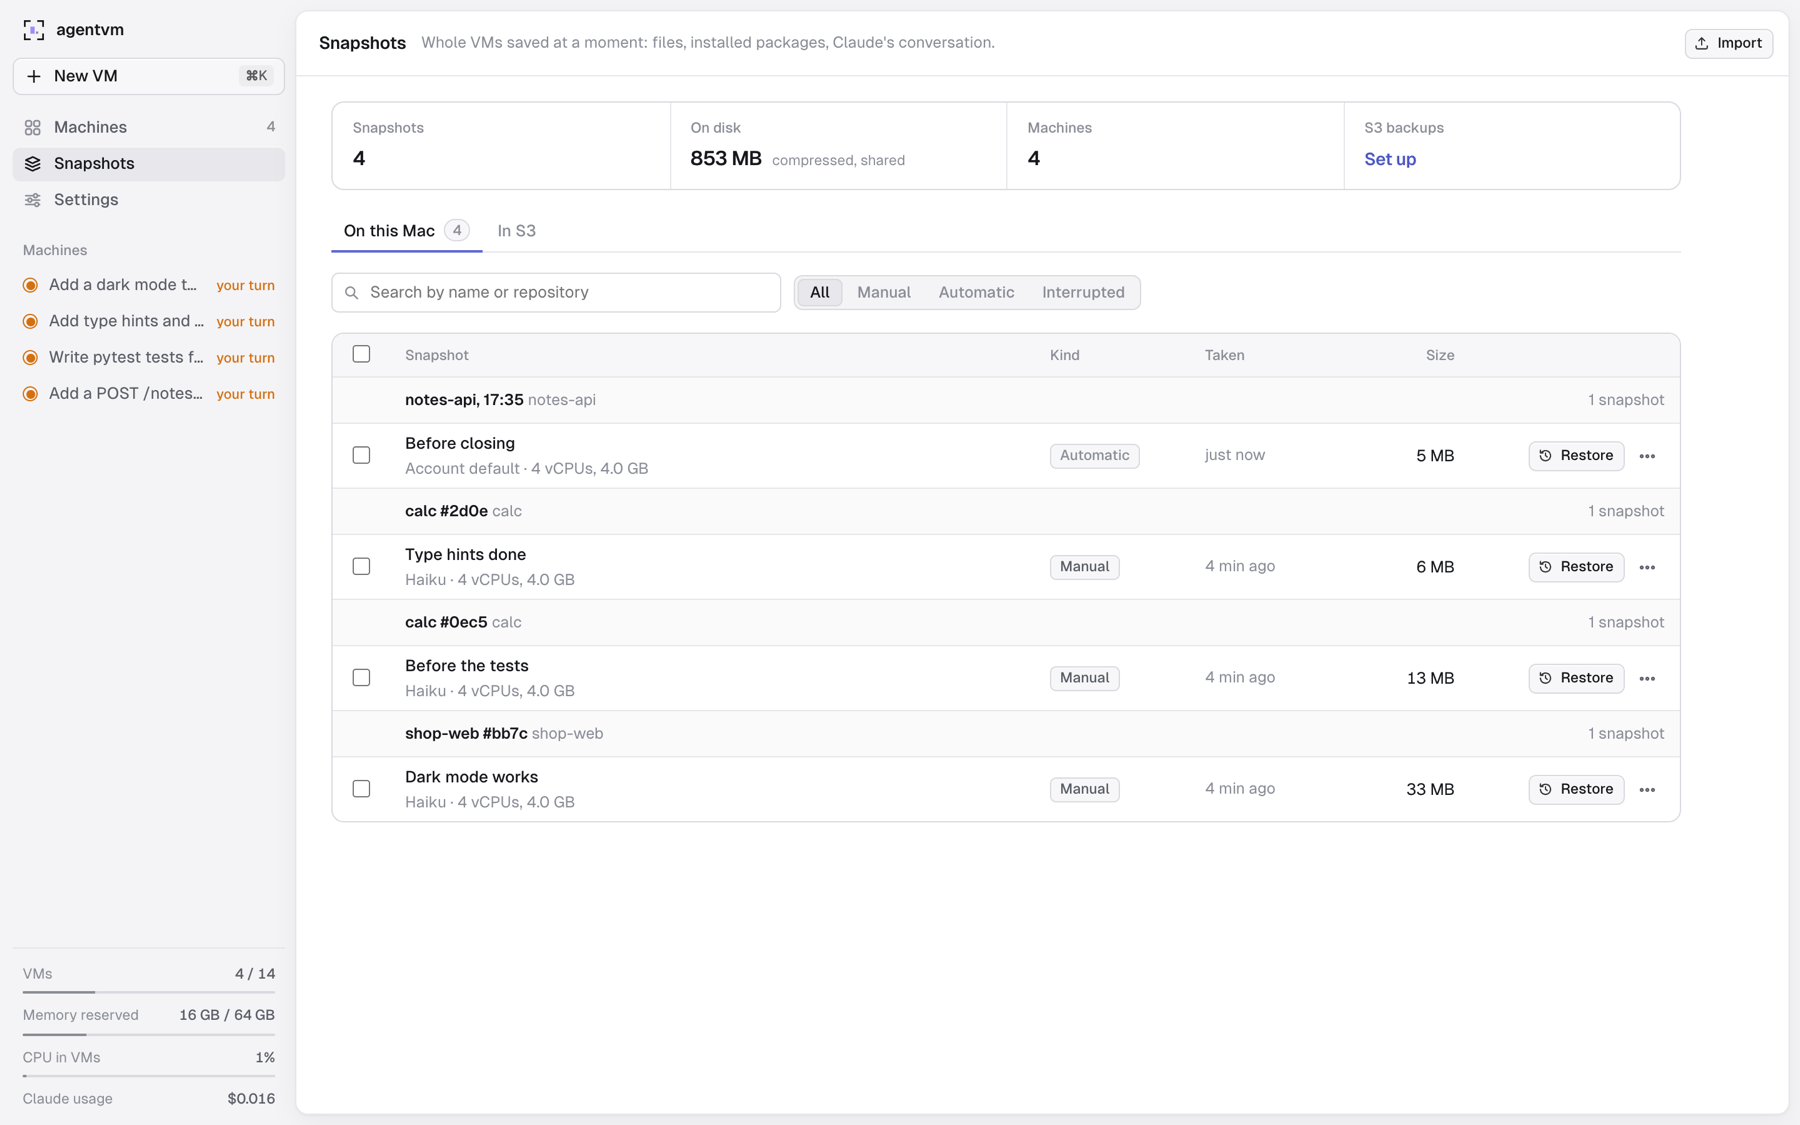
Freeze a VM, restore it later
A snapshot freezes the whole VM: files, installed packages and Claude’s conversation. Take one by hand, or let agentvm take one every 30 minutes (it keeps the newest 4 per VM) and one more just before a VM closes. Restore any of them into a new VM, where Claude continues its last conversation.
Disks are stored as 1 MiB chunks named by their BLAKE3 hash and compressed with zstd, and a chunk shared by several snapshots is stored once: here four snapshots of four machines take 853 MB in all, each adding only what changed. Export one as .tar.zst, import it on another Mac, or back it up to any S3-compatible storage.
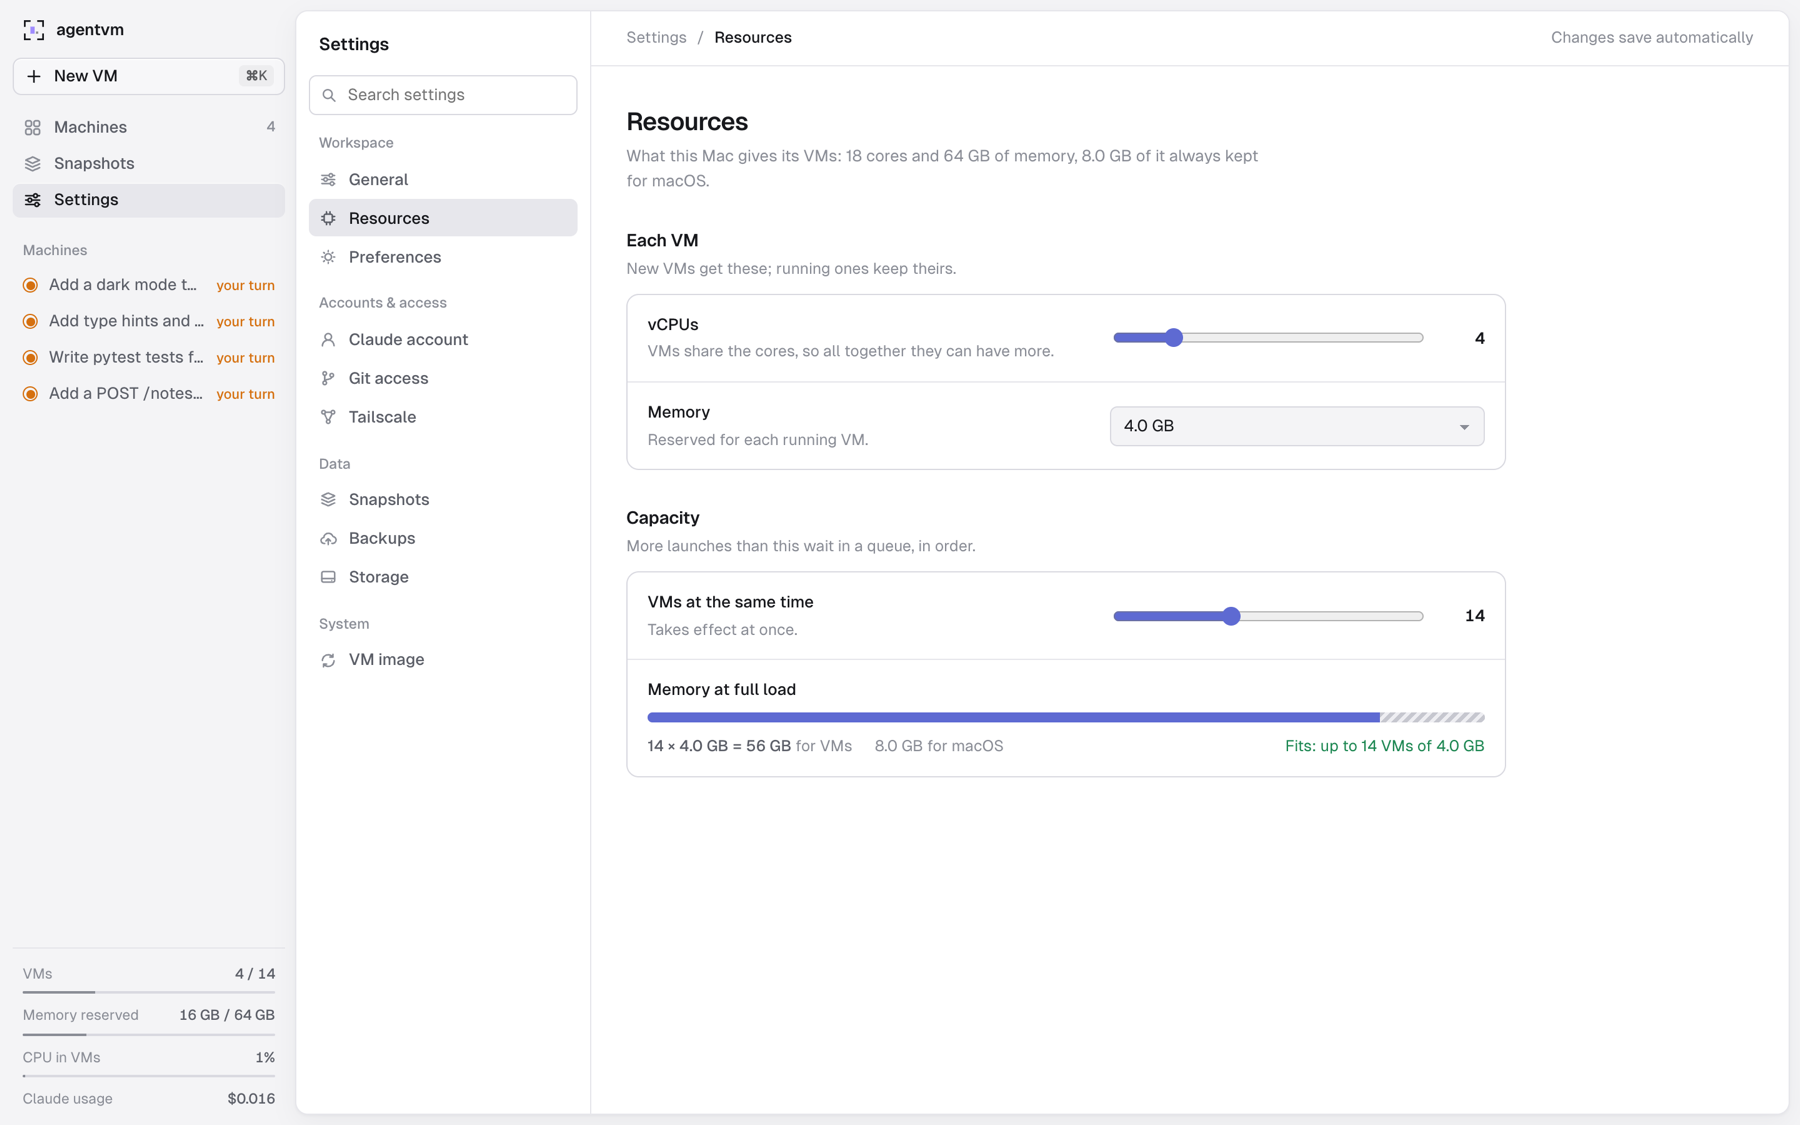
As many VMs as your Mac can hold
Set the vCPUs and memory each new VM gets and how many run at the same time; more launches wait in a queue, in order. By default agentvm runs as many as fit in memory and keeps 8 GB for macOS: 14 VMs of 4 GB on a 64 GB Mac.
A VM starts only when macOS reports the memory free, and one idle for 60 seconds gives back everything but what it uses plus 1 GB. Settings also hold your Claude account, git access, Tailscale, backups and the VM image, with every secret in the macOS Keychain.
Under the hood
-
A golden image
Debian’s official arm64 cloud image, made ready with Claude Code, git, build tools, Python, Node, Chromium, tmux and zsh. Each VM starts from an APFS clone of it.
-
One process per VM
A small Swift helper on Apple’s Virtualization.framework owns one VM. A crashing VM never takes the Rust server down, and the server restarts without stopping VMs.
-
No network for control
The repository goes in and comes back as a git bundle through the VM’s own virtiofs folder; terminals and forwarded ports travel over vsock.
-
Local only
The dashboard and every forwarded port listen on 127.0.0.1, and requests from other hosts or sites are rejected. Git tokens and the S3 key never leave the Mac.
- New VM to a ready terminal
- 2.0 s
- Debian boot inside it
- 1.05 s
- Keystroke to echo, through the server and the VM
- ~2 ms
- Six real snapshots as shared chunks, instead of ~20 GB
- 1.19 GB
Measured by agentvm on an M5 Max with 18 cores and 64 GB of memory.
Operate it from your browser.
bunqueue dashboard is a free operator console for your server: jobs, dead letters, cron, workers, workflows and the server process, in one place.
bunx bunqueue-dashboardServes the dashboard on 127.0.0.1:8080 and connects to your server's HTTP API on port 6790.
-
See it live
Server health, throughput, per-queue status, workers and a streaming activity feed.
-
Work the jobs
Browse, inspect and enqueue jobs, triage the dead letter queue and manage cron schedules.
-
Run the server
Start, stop and restart the process, follow its logs and query SQLite over a read-only connection.
-
Safe by default
Actions the server cannot perform atomically stay disabled. The control agent stays on loopback.
Already running in the open.
Open-source projects that use bunqueue for their background work.
- context-labs/HALO 1.1k GitHub stars
Hierarchical Agent Loop Optimizer.
Runs Langfuse, Phoenix and file imports plus HALO analysis tasks as bunqueue jobs.
- MagicCube/agentara 515 GitHub stars
A 24/7 personal assistant built on Claude Code and OpenAI Codex.
Dispatches tasks with per-session serial execution and cron schedules.
- dosco/aithy 107 GitHub stars
A personal AI agent that works safely on your machine.
Embedded queues for agent dispatch, memory consolidation, expiry and automations.
- phuctm97/openkitten 34 GitHub stars
A Telegram-first AI agent.
Schedules recurring runs and exposes queue status through MCP tools.
Your first job, end to end.
Pick how you run the queue, then follow three steps. Both paths are free, with the same core queue features.
Start the server
Run it with Docker, or with the Bun CLI if Bun is installed. Keep it running.
- Client connection
- 127.0.0.1:6789 TCP
- HTTP API
- 127.0.0.1:6790 HTTP
With Docker running, choose a base image and copy the command. No Bun installation needed.
The default: a compact musl base with a shell and apk. Same bunqueue features on AMD64 and ARM64.
docker run -d --name bunqueue \--restart unless-stopped \-p 127.0.0.1:6789:6789 \-p 127.0.0.1:6790:6790 \-v bunqueue-data:/app/data \egeominotti/bunqueue:alpineA full Debian base with glibc, a shell and apt. Same bunqueue features on AMD64 and ARM64.
docker run -d --name bunqueue \--restart unless-stopped \-p 127.0.0.1:6789:6789 \-p 127.0.0.1:6790:6790 \-v bunqueue-data:/app/data \egeominotti/bunqueue:debianDebian with glibc, a shell and apt, with fewer bundled utilities. Same bunqueue features on AMD64 and ARM64.
docker run -d --name bunqueue \--restart unless-stopped \-p 127.0.0.1:6789:6789 \-p 127.0.0.1:6790:6790 \-v bunqueue-data:/app/data \egeominotti/bunqueue:slimRequired runtime libraries only. No shell or package manager. Same bunqueue features on AMD64 and ARM64.
docker run -d --name bunqueue \--restart unless-stopped \-p 127.0.0.1:6789:6789 \-p 127.0.0.1:6790:6790 \-v bunqueue-data:/app/data \egeominotti/bunqueue:distrolessCheck that the server is ready:
curl --fail http://127.0.0.1:6790/healthPorts stay local to your machine. SQLite data persists in the
bunqueue-datavolume when you replace the container. Run one variant at a time. These tags follow new releases; pin a version or digest for deployment.In a terminal with Bun installed, start the included server.
bunx bunqueue start --host 127.0.0.1 --data-path ./bunqueue.dbJobs persist in
./bunqueue.db, a local SQLite file. The server is included in the MIT-licensed package.Connect your app and worker
Open another terminal. Install a client, save the example, then run it.
SDK guides and connection optionsnpm install bunqueue-clientjobs.mjs import { Queue, Worker } from 'bunqueue-client';const options = {embedded: false,connection: { host: '127.0.0.1', port: 6789 },};const queue = new Queue('emails', options);const worker = new Worker('emails',async (job) => {console.log('Processing:', job.data.to);return { sent: true };},options);worker.on('error', (error) => console.error(error));await queue.add('welcome', { to: 'hello@example.com' });node jobs.mjsbun add bunqueue-clientjobs.mjs import { Queue, Worker } from 'bunqueue-client';const options = {embedded: false,connection: { host: '127.0.0.1', port: 6789 },};const queue = new Queue('emails', options);const worker = new Worker('emails',async (job) => {console.log('Processing:', job.data.to);return { sent: true };},options);worker.on('error', (error) => console.error(error));await queue.add('welcome', { to: 'hello@example.com' });bun jobs.mjsdeno add npm:bunqueue-clientjobs.ts import { Queue, Worker } from 'bunqueue-client';const options = {embedded: false,connection: { host: '127.0.0.1', port: 6789 },};const queue = new Queue<{ to: string }>('emails', options);const worker = new Worker<{ to: string }>('emails',async (job) => {console.log('Processing:', job.data.to);return { sent: true };},options);worker.on('error', (error) => console.error(error));await queue.add('welcome', { to: 'hello@example.com' });deno run --allow-net --allow-env --allow-read --allow-sys jobs.tspip install bunqueue-clientjobs.py from bunqueue import Queue, Workerconnection = {"host": "127.0.0.1", "port": 6789}queue = Queue("emails", **connection)queue.add("welcome", {"to": "hello@example.com"})queue.close()def process(job):print("Processing:", job.data["to"])return {"sent": True}Worker("emails", process, **connection).run()python jobs.pycomposer require bunqueue/client # PHP 8.1+ and Composerjobs.php <?phprequire __DIR__ . '/vendor/autoload.php';use Bunqueue\Job;use Bunqueue\Queue;use Bunqueue\Worker;$connection = ['host' => '127.0.0.1', 'port' => 6789];$queue = new Queue('emails', $connection);$queue->add('welcome', ['to' => 'hello@example.com']);$queue->close();$worker = new Worker('emails', function (Job $job) {echo 'Processing: ', $job->data()['to'], PHP_EOL;return ['sent' => true];}, $connection);$worker->run();php jobs.phpgo mod init jobs && go get github.com/egeominotti/bunqueue/sdk/go # Go 1.26.5+main.go package mainimport ("fmt"bunqueue "github.com/egeominotti/bunqueue/sdk/go")func main() {queue := bunqueue.NewQueue("emails", bunqueue.Options{Host: "127.0.0.1", Port: 6789})defer queue.Close()if _, err := queue.Add("welcome", map[string]any{"to": "hello@example.com"}, nil); err != nil {panic(err)}worker := bunqueue.NewWorker("emails", func(job *bunqueue.Job) (any, error) {fmt.Println("Processing:", any(job.Data()).(map[string]any)["to"])return map[string]any{"sent": true}, nil}, bunqueue.WorkerOptions{Host: "127.0.0.1", Port: 6789})worker.Run()}go run .cargo new jobs && cd jobs && cargo add bunqueue-clientsrc/main.rs use bunqueue_client::{ConnectionOptions, JobOptions, Queue, Value, Worker, WorkerOptions};fn main() -> Result<(), Box<dyn std::error::Error>> {let connection = ConnectionOptions {host: "127.0.0.1".into(),port: 6789,..Default::default()};let queue = Queue::new("emails", connection.clone());let data = Value::Map(vec![(Value::from("to"), Value::from("hello@example.com"))]);queue.add("welcome", data, JobOptions::default())?;let worker = Worker::new("emails",|job| {println!("Processing: {}", job.data()["to"].as_str().unwrap_or_default());Ok(Value::Map(vec![(Value::from("sent"), Value::from(true))]))},WorkerOptions { connection, ..Default::default() },);worker.run()?;Ok(())}cargo rungit clone --depth 1 https://github.com/egeominotti/bunqueue && mix new jobs && cd jobsmix.exs # Replace the generated deps/0. Hex release upcoming: until then, use the# bunqueue checkout next to this project as a path dependency.defp deps do[{:bunqueue_client, path: "../bunqueue/sdk/elixir"}]endjobs.exs connection = [host: "127.0.0.1", port: 6789]queue = Bunqueue.queue("emails", connection){:ok, _job} = Bunqueue.Queue.add(queue, "welcome", %{to: "hello@example.com"})worker =Bunqueue.Worker.new("emails",fn job ->IO.puts("Processing: #{job.data["to"]}"){:ok, %{sent: true}}end,connection: connection)Bunqueue.Worker.run(worker)mix local.hex --force && mix deps.get && mix run jobs.exsSee it work
The worker picks up the job your app just added. Both use the same queue name and TCP address. The worker keeps waiting for jobs: press Ctrl+C to stop it.
Worker outputProcessing: hello@example.com
Install bunqueue
Use embedded mode when your app and worker run together on Bun. The queue engine lives inside your application.
- Runtime
- Bun
- Separate server
- Not needed
- Connection address
- Not needed
bun add bunqueueAdd a job and process it
Set
Read the full quickstartembedded: trueon both the queue and the worker, then run the file.jobs.ts import { Queue, Worker } from 'bunqueue/client';const queue = new Queue<{ to: string }>('emails', { embedded: true });const worker = new Worker<{ to: string }>('emails',async (job) => {console.log('Processing:', job.data.to);return { sent: true };},{ embedded: true });worker.on('error', (error) => console.error(error));await queue.add('welcome', { to: 'hello@example.com' });bun jobs.tsSee it work
The worker keeps waiting for jobs: press Ctrl+C to stop it. The example keeps jobs in memory; configure SQLite persistence to recover work after a restart.
OutputProcessing: hello@example.com
Every stage of a job, covered.
Start with a queue and a worker. Add the controls your workload needs. Every feature is included.
- Before it runs
Control what runs next.
Priorities, delayed jobs, rate limits, concurrency controls and FIFO groups.
Queue controls - While it runs
See what is happening.
Progress updates, heartbeats and stall detection, plus job queries, Prometheus metrics, health probes and events. Watch it all in the web dashboard, or connect AI tools through the native MCP server.
Monitoring and operations - When it fails
Make failed work retryable.
Retries with backoff, stall recovery and a dead letter queue you can inspect and replay.
Retries and recovery - After it completes
Coordinate what comes next.
Parent-child flows continue once their children complete, and cron schedules queue the next run. A separate workflow engine adds in-process orchestration on Bun.
Flows and dependencies
Official clients share the Queue/Worker/Flow core. Check the SDK capability matrix for language-specific APIs.
Start small. Keep your options.
Choose storage when you need it. Your application keeps the same queue API at every step.
-
:memory:Try it in memory
The default. Nothing to provision. Jobs are ephemeral and disappear when the process exits.
-
queue.dbPersist to SQLite
One file, owned by one process. Run embedded on Bun or connect clients to a standalone server.
-
postgres://Run multiple brokers
Use PostgreSQL as the shared store for several active servers. Operate the database and routing yourself.
Coming from BullMQ?
Keep the Queue and Worker mental model. bunqueue uses its own engine and protocol, with SQLite or PostgreSQL for persistence.
Read the migration guide- Moving a Node.js app?
- Use
bunqueue-clientand connect to a bunqueue server. Your application stays on Node.js. - Check the differences first.
- Review compatibility and scheduling behavior in the full comparison. Explore the benchmark methodology for performance evidence.
A few things, made clear.
The cost, the name, and the connection.
Is there anything I have to pay for?
bunqueue is completely free and open source under the MIT license. The server, clients and queue features are included. There is no paid plan or feature paywall. If you rent a server or database, you pay your infrastructure provider.
Why is it called bunqueue?
The core engine uses Bun and its native APIs. The standalone server and embedded runtime require Bun. Network clients use their own runtime, including Node.js, Deno, Python, PHP, Go, Rust and Elixir.
Do I need a bunqueue account or a hosted service?
No. Start the included server on your machine or your own infrastructure, then point your client at its host and TCP port. A Bun application can also use embedded mode without a separate server.
Why is my client not connecting?
For server mode, start the server first and use a reachable hostname with TCP port 6789. Port 6790 is the HTTP API. Inside Docker, localhost refers to that container. For embedded mode, run on Bun and set embedded: true on both Queue and Worker.
Your jobs. Your infrastructure.
Free and open source, from the first local job to production.
Explore the documentation